
Traefik 2 as Docker Reverse Proxy on UnRAID
Hosting multiple containers on unRAID, and keeping track of their port mappings can become quite annoying. Using a reverse proxy as a single point of entry will allow us to hide this from the user, and use easy to remember DNS records instead.
In this example we will use Traefik 2.x as a reverse proxy on an unRAID 6.8.x machine, and configure easy access to the unRAID webUI, Traefik dashboard, as well as an example Wordpress container, to show how traffic can be routed to any container running on unRAID.
Configure DNS Records
First we need to create three DNS records, all pointing to the box unRAID is
running on. In this example we assume the TLD home, and unRAID
running on 192.168.1.10.
unraid.home→192.168.1.10traefik.home→192.168.1.10wordpress.home→192.168.1.10
How and where to configure these depends on the DNS server you are using.
Reconfigure unRAID’s HTTP Port
Traefik will be listening on port 80 and we need to free up this port,
since unRAID’s WebUI will be using it by default.
Go to Settings → Management Access, and change HTTP port.
Here we will be using HTTP port: 8085.
In case your Traefik container is broken, you can always access your
unRAID server at http://192.168.1.10:8085.
Prepare Traefik Configuration
In order to configure Traefik we will be using a mix of dynamic configuration (via Docker labels), and static configuration (via configuration files).
Place the following configuration files in your appdata share.
appdata/traefik/traefik.yml
api:
  dashboard: true
  insecure: true

entryPoints:
  http:
    address: ":80"

providers:
  docker: {}
  file:
    filename: /etc/traefik/dynamic_conf.yml
    watch: true
appdata/traefik/dynamic_conf.yml
http:
  routers:
    unraid:
      entryPoints:
      - http
      service: unraid
      rule: "Host(`unraid.home`)"
  services:
    unraid:
      loadBalancer:
        servers:
        - url: "http://192.168.1.10:8085/"
Launch Traefik Container
Now we can launch the actual Traefik container. Go to the Docker tab
in unRAID and ADD CONTAINER.
We need to fill in the following configuration:
Name: traefik
Repository: traefik:latest
Network Type: bridge
Add a port mapping from 80 → 80, so that Traefik can listen for incoming
HTTP traffic.
Add a path where we mount our /mnt/user/appdata/traefik to /etc/traefik
so that Traefik can actually read our configuration.
Add another path where we mount our Docker socket /var/run/docker.sock
to /var/run/docker.sock. Read-only is sufficient here. This is required
so Traefik can listed for new containers and read their labels, which is used
for the dynamic configuration part. We are using this exact mechanism to expose
the Traefik dashboard now.
Add a label
- key =
traefik.http.routers.api.entrypoints - value =
http
Add another label
- key =
traefik.http.routers.api.service - value =
api@internal
And a final label
- key =
traefik.http.routers.api.rule - value = Host(`traefik.home`)
Final configuration in unRAID
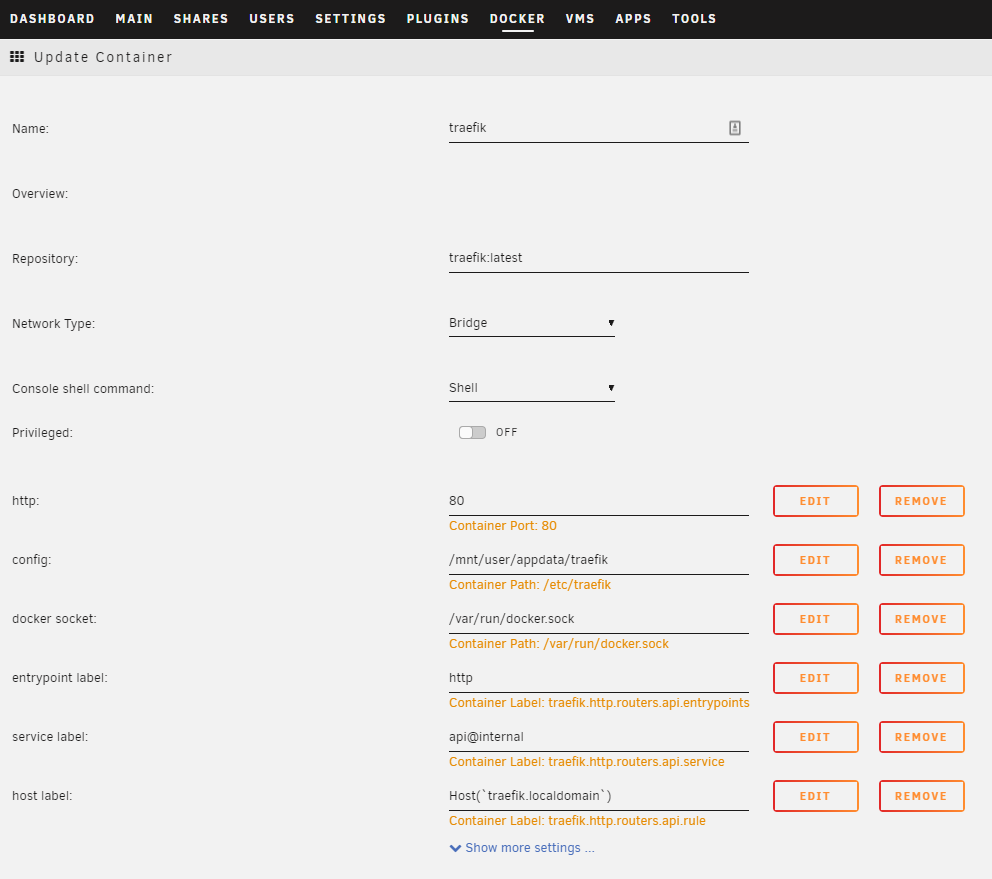
Container configuration in unRAID.
After creating the container you are now able to access unRAID at http://unraid.home, and the Traefik dashboard at http://traefik.home.
Proxying any Container
In order to add another container to our Traefik configuration we simply need to add a single label to it.
Assuming we have a Wordpress container running we can add a label with
- key =
traefik.http.routers.wordpress.rule - value = Host(`wordpress.home`)
If our container is only exposing a single port, Traefik is smart enough to pick it up, and no other configuration is required.
If our Wordpress container would expose multiple ports, but the webUI is accessible on port 8080 we would need to add an additional label with
- key =
traefik.http.services.wordpress.loadbalancer.server.port - value = 8080